Written by Natalie Behunin, Prepared by Katrice Stover

Introduction
This document will outline how the Flying Pig Designs Ornament is made. Supplies used: capsule plastic ornaments, 3D-printed pigs, clear illusion cord, craft snow, spray paint, acrylic paint, glitter paint, UV cure adhesive, ribbon, and ornament hooks.
How to Make the FPD Ornament
Preparation
This section includes painting materials and making bows. Allow between 12-24 hours for paint to dry and glue to cure before assembly can be completed.
- Start by wrapping the exterior of one half of the plastic ornament with masking tape. It’s preferable to use the ornament half with the under-cut to simplify assembly later.
a. If masking tape is used, cover the entirety of the exterior surface and remove the masking tape IMMEDIATELY AFTER SPRAYING. Do NOT allow any paint to dry underneath the tape. Side effects can be seen in Figure 1.

- Once masking tape is securely in place, use an ornament hook to hold the ornament and apply a layer of paint primer into the interior of the ornament half, followed by a layer of spray-paint. Take care not to spray too close or too quick; doing so will result in drip paths.
- Before applying a second layer, wait until the paint is dry to touch, as indicated on the spray paint. Apply as many layers are needed until coats are even as seen in Figure 2.

- While the ornaments are drying, prepare the 3D-printed pigs for painting by cleaning them thoroughly of strut material.
- Once cleaned, apply a layer of primer on all sides of the pig followed by a layer of spray paint on one side. It is easiest to do one side at a time to avoid smearing the paint.
- Before painting more sides or applying a second layer, wait until the paint is dry to touch, as indicated on the spray paint. Apply as many layers are needed until pig is fully covered as seen in Figure 3.
- Once pigs are dry to touch, apply a gloss finish to all sides.

The following steps can be completed when the ornaments and pigs are dry enough to handle.
- Inspect each ornaments half for damage or paint on the exterior. If there is chemical damage, as seen in Figure 1, the ornament half can not be used. If there is noticeable paint collection on the exterior of the ornament half, first try gently removing it with rubbing alcohol or fine grit sandpaper. If that does not work, the exterior of the ornament half may also be painted.
a. If the ornament half exteriors need to be painted: Refer to step 2, skipping the masking tape and spraying the exterior instead. Hang the ornament halves to dry. Apply as many layers as needed. Once paint is dry to touch, apply a gloss finish to the exterior.
- Apply a coat of glitter paint to the interior of the ornament half.
- Once the glitter paint is dry to touch, use white acrylic paint, a thin paintbrush, and an artist’s sea sponge to create clouds (Figure 4). Set aside to dry.

- Inspect each pig for full coverage. Apply more spray paint as needed.
- Using a small drill bit not much bigger than the clear illusion cord, drill out a shallow hole at the location shown in Figure 5.

- Using the UV cure adhesive, dispense a small amount of glue into the hole (Figure 6).

Take about 1.5” of clear illusion cord and hold it in the hole while curing the glue. The cord should be sticking out normal to the back of the pig (Figure 7).

The next steps are for making the bow and should be done while the ornaments are drying.
- Cut about 4” of ribbon. Cut both ends at a 45-degree angle (Figure 8).

16. Following the images below in Figure 9, make the bow by overlapping the ribbon to create two loops on each side, glitter side up. Cut the ribbon at the end. If using double-sided ribbon, this step can be completed by overlapping the ribbon over itself in stacks.

17. Using twine or a length of ribbon cut in half, tie the two pairs of ribbon together to form the bow. Secure the knot by super-gluing it (Figure 10).

Assembly
The following steps detail how to assemble the ornament and should not be completed until the ornament half and pig are fully dry.
- Using a Dremel with a thin blade, cut a slot into the ornament half with the under-cut. This should be the painted ornament half. Cut the slot to almost full allowable depth at the location indicated in Figure 11.

19. Fill the painted ornament half with craft snow until about ½ full, then place the pig in the ornament half with its cord passing through the slot that was just created (Figure 12).

- Put both ornament halves together keeping just the top open enough to adjust the rotation and height of the pig. Once in a suitable position, fully close the ornament halves together.
- Dispense a small droplet of UV adhesive where the cord exits the ornament loop to keep the cord in place and prevent the ornament from opening (Figure 13). Cure the glue and cut the excess cord.

22. Adjust the bow to the top of the ornament, leaving enough coverage for the ornament hook to attach to the loop. Note the places the bow contacts the ornament and dispense glue onto the bow in those locations (Figure 14). While firmly holding the bow to the ornament, cure the glue thoroughly. Give a gentle tug to the bow to ensure it is firmly attached.

23. Feed the ornament hook through the space that is left of the loop on top of the ornament to complete the ornament (Figure 15).

Packaging
24. Print labels onto label paper (Figure 16).

25.Gently place completed ornaments into 2”x2” box and tape closed with clear tape.
26. Stick label onto the top of the closed box (Figure 17).

Development Process
The process began with a brainstorm on ideas. The first idea was an un-painted ornament with a gold pig “floating” inside. When brought to life, the prototype lacked definition and excitement. The basic idea was kept, and craft snow was introduced; however, it needed more color and depth. Additional ideas were introduced as shown in Figure 18.

At this stage, it was suggested to paint one half of the ornament sections. The initial color chosen was black. The suggestion introduced the definition and depth the ornament was lacking.
Still missing color, the color was changed to sky blue to imitate a flying pig above the clouds. Additional details came easily; the sky needed clouds, glitter paint gave shine and reflection, and red bows are present on many Christmas-themed merchandise.
With the ornament complete, a box needed to be chosen for shipping. To choose the correct size box, a replica box was glued together with cardboard scraps, as seen in Figure 19. Although rudimentary, it was enough to go off to decide the proper box size.

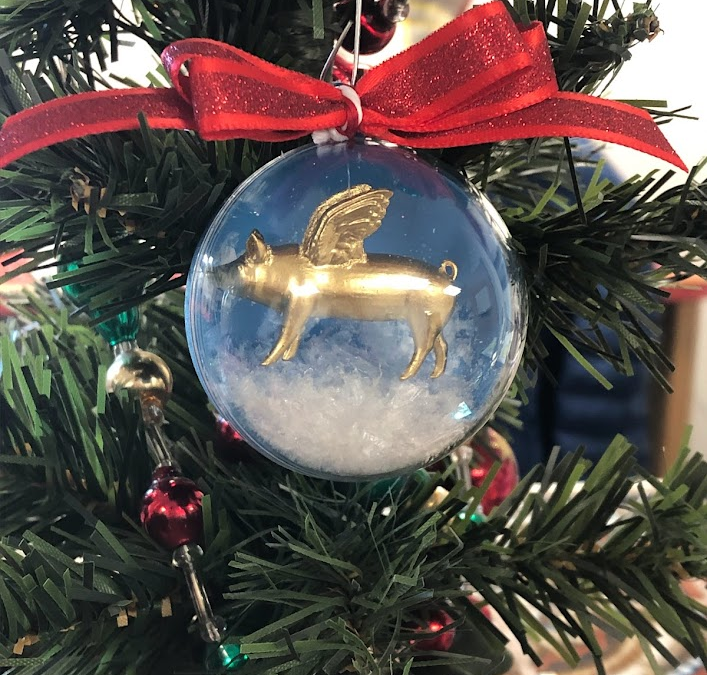
All of these ideas came together to make the Flying Pig Designs 2022 Holiday ornament! Natalie Behunin was the mastermind behind these beautiful creations, and we are thrilled with the result.
Happy Holidays everyone!

(720) 627-7778
555 Alter St. STE 19-D Broomfield, CO 80020


Katrice Stover is the Community and Office Manager for Flying Pig Designs LLC. She’s passionate about providing informative, engaging content for inventors, creatives, engineers, and industry professionals alike. In her spare time, you can find her dancing with her daughter, playing video games, and dying her hair vibrant colors.
Recent Comments